(Cleanup) |
(Updated) |
||
| (3 intermediate revisions by 2 users not shown) | |||
| Line 1: | Line 1: | ||
| + | Textures are the 2D images placed on 3D models to give them their surface looks. For example, a simple cube model could be turned into a wooden box, or a man could have clothing designed for him. To apply the texture, the modeller must link the texture to the model. This page only applies to [[Blender]]. |
||
| − | {{Cleanup}} |
||
| + | ==Linking the texture== |
||
| − | To use textures in glest you must add a material to your object. |
||
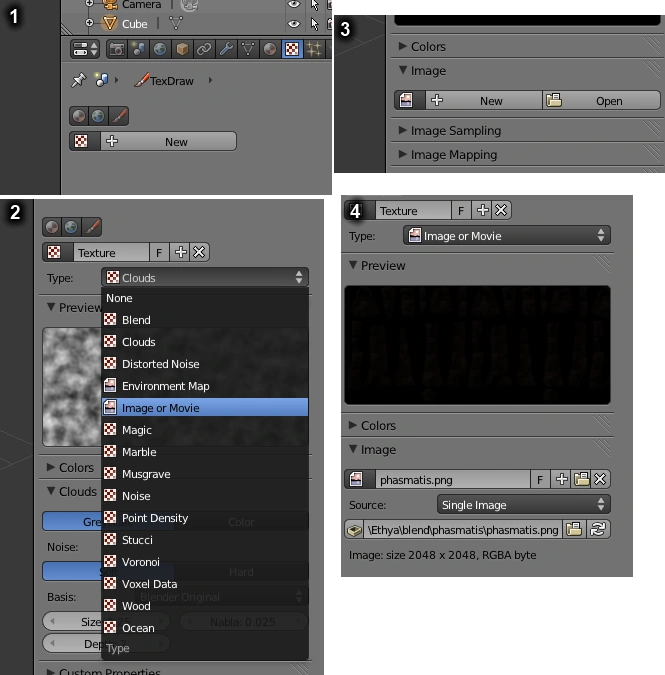
| + | #In the Properties window, open the Textures tab. |
||
| − | Select an object and do the following. After this your texturemapping |
||
| + | #Click new, and from the type dropdown box, choose Image or Movie. |
||
| − | will be exported to the xml-File. |
||
| + | #Under the Image heading, click open and choose your texture. |
||
| + | #You should now see something similar to this. |
||
| + | [[File:Attaching_a_texture.png]] |
||
| + | ==Proper previewing in blender== |
||
| + | To view the texture in Blender, you must use a different method that does '''not''' allow exporting with the texture linked, so both must be done if you wish to be able to see the texture in Blender and when exporting. |
||
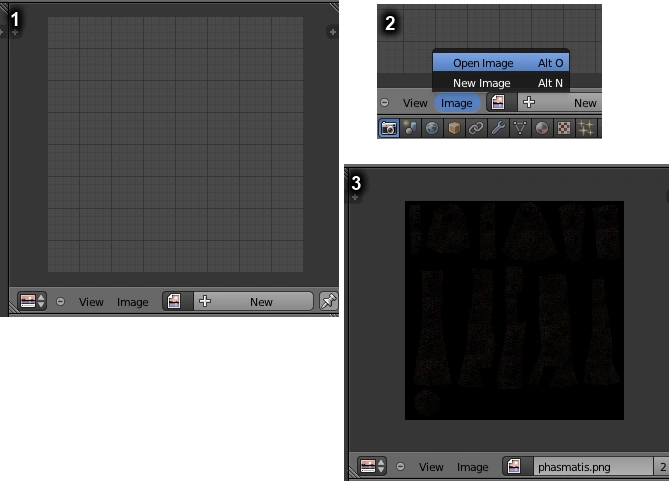
| + | #Open a UV/Image Editor window, ensure your model is selected in edit mode first. |
||
| + | #From the menu, choose Image > Open Image and select your image file. |
||
| + | #You should now see something similar to this. |
||
| + | [[File:Previewing_textures_in_Blender.png]] |
||
| + | ==See Also== |
||
| − | |||
| + | *[[Blender]] |
||
| − | '''IMAGE1:''' |
||
| + | *[[Teamcolor|Transparency and Teamcolor]] |
||
| − | *1. here is the name of the material added to your object |
||
| + | *[[Transparent teamcolor]] |
||
| − | *2. here is a list of available textures |
||
| − | *3. press TextFace button |
||
| − | *4. press here and select UV instead of ORCO |
||
| − | *5. press here to continue |
||
| − | |||
| − | [[Image:texture1.png]] |
||
| − | |||
| − | '''IMAGE2:''' |
||
| − | *1. select "Image" here |
||
| − | *2. press the "load button" to load an imagefile ( in the screenshot the image is already loaded ) |
||
| − | |||
| − | [[Image:texture2.png]] |
||
[[Category:Blender]] |
[[Category:Blender]] |
||
[[Category:Modelling]] |
[[Category:Modelling]] |
||
Latest revision as of 22:58, 17 April 2012
Textures are the 2D images placed on 3D models to give them their surface looks. For example, a simple cube model could be turned into a wooden box, or a man could have clothing designed for him. To apply the texture, the modeller must link the texture to the model. This page only applies to Blender.
Linking the texture[]
- In the Properties window, open the Textures tab.
- Click new, and from the type dropdown box, choose Image or Movie.
- Under the Image heading, click open and choose your texture.
- You should now see something similar to this.
Proper previewing in blender[]
To view the texture in Blender, you must use a different method that does not allow exporting with the texture linked, so both must be done if you wish to be able to see the texture in Blender and when exporting.
- Open a UV/Image Editor window, ensure your model is selected in edit mode first.
- From the menu, choose Image > Open Image and select your image file.
- You should now see something similar to this.